Sew English Paper Piecing without Paper

August 9, 2023

English Paper Piecing without Paper

Nic Vaughan shares how to sew English paper piecing without the paper. 

Hi there [waves from all the way over in Perth, Australia snuggling under a quilt with one of my three kitties]! I’m Nic, the designer and creator of Craftapalooza Designs (yep, it’s a mouthful) and today I’m going to share with you my love, passion and joy for sewing quilts… hand sewing [no, I have not lost my marbles!]. Yes, you correctly read the title of this post! Let’s English paper piece (EPP) without the paper. Some call it hand piecing (ie piecing a quilt together) and it’s also called hand sewing. 

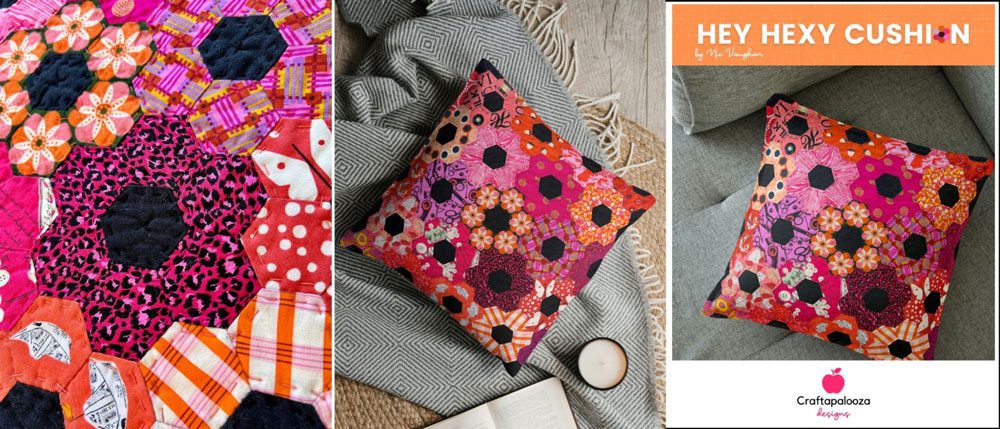
Today I’m going to teach you how to sew one-inch hexagons together without using papers. We’ll make a practical panel that could be transformed into any project. But it’s perfect for my Hey Hexy Cushion pattern too.

English Paper Piecing

I’ve included all the instructions you’ll need for paper-free hexagon stitching in the tutorial below. But if you’d prefer a printable tutorial, just follow this LINK to download the free PDF. There’s also a deal just for Quilter’s Candy readers to get the Hey Hexy Cushion Pattern at a very special price! 

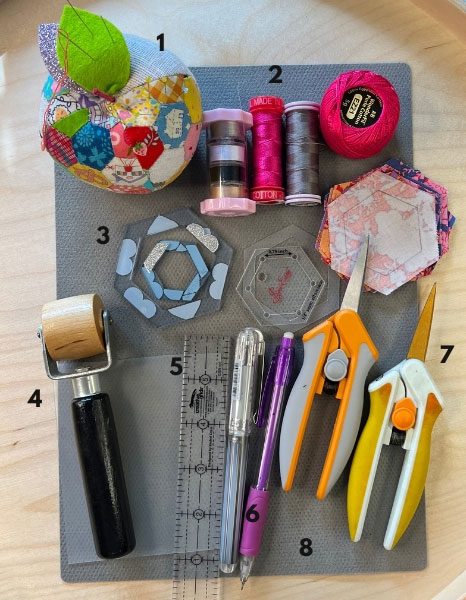
You Will Need

  1. Milliner’s Needle in size 10 or 11 (for hand sewing) 
  2. Thread 50-80 weight
  3. 1’’ acrylic hexagon template (which includes seam allowance)
  4. Seam roller
  5. Ruler to mark ¼’’
  6. Fabric marking pens/pencil
  7. Scissors (for fabric and plastic)
  8. Design mat or sandpaper board

Read about my favorite tools and notions for hand sewing HERE.

Let’s Prepare

As with any patchwork, preparation will set you up for success. That’s why I batch-prepare, trace and cut the fabric hexagons for the project first. If it’s a small project, I’ll prepare all the hexagons in one go. If it’s a larger quilt, I’ll break it up with fabric preparation and hand sewing. 

TIPS: I always test a block before I cut up all the fabric! Depending on the shapes that I’m cutting, I’ll rotary cut, or scissor cut. I use scissors that have a spring to help with hand fatigue. The shorter blade is great for control and speed!

Preparing The Fabric Hexagons 

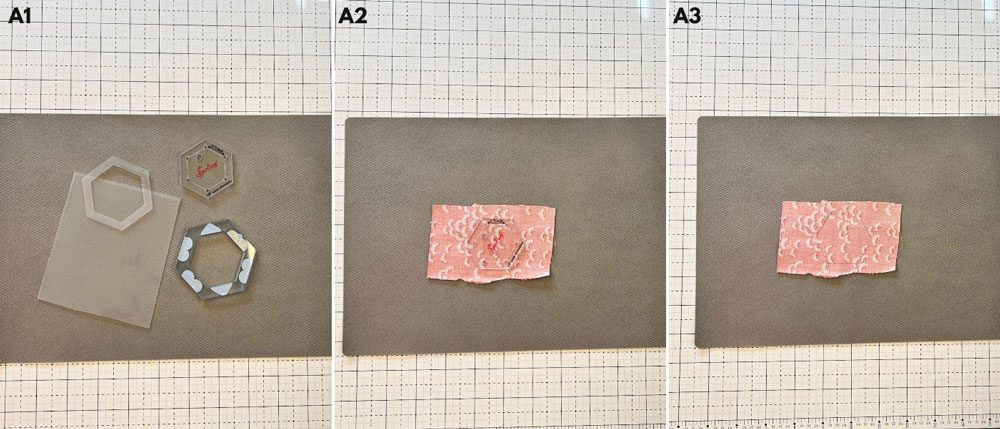
Use an acrylic hexagon template A1. Position the template onto the fabric A2 and trace around the shape with a fabric marking pen or pencil A3

TIP: Use a design mat (the gray mat pictured below) to stabilize the fabric and reduce drag and distortion when tracing. A sandpaper board could also be used.

A EPP Diagram

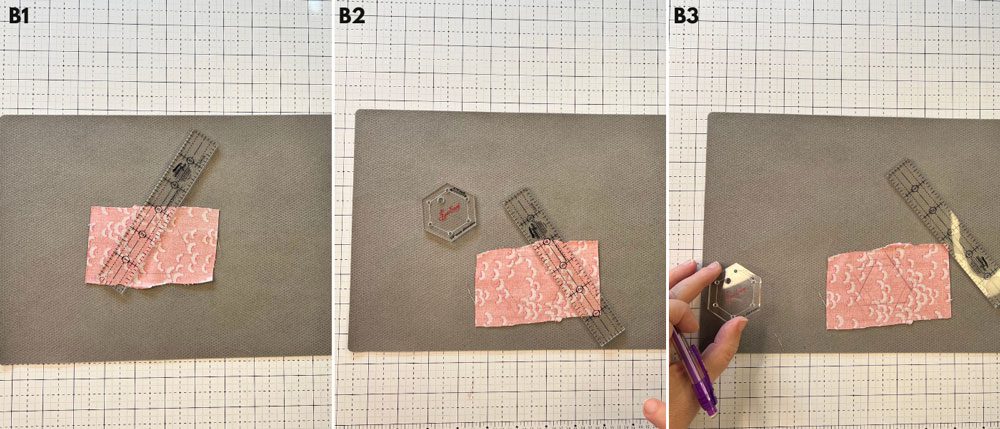
In most instances, the acrylic template will have a seam allowance included, so the seam lines need to be drawn on the inside of the shape and these will be the stitching lines. To do this, take the quilt ruler and mark ¼’’ seams on the inside of the hexagon shape, as shown in B1-B3. The inside shape will have sides measuring 1’’. 

EPP B Diagram

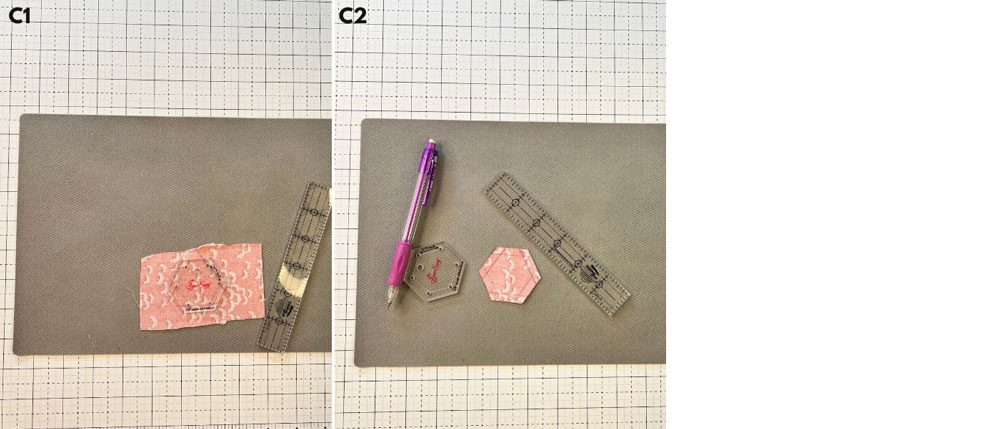
Place the template over the traced shape to check the seams for accuracy C1. NOTE: I do not do this for the whole quilt. If the shape is sized accurately and correctly, cut out the hexagon shape on the outside line C2. Repeat the process to create the required hexagons for your block or project (or batch prepare a bunch to get started on a quilt).

EPP C Diagram

Let’s Hand Sew The Hexagons

Now for the fun part. To hand sew hexagons without papers, we will sew in rows and then sew a zig-zag (y-seam) between the rows to join them together. NOTE: When you’re hand piecing, you don’t sew into the seam allowance. This allows for the seams to pivot. 

Lay out the hexagons so you know what order to sew them in. For my Hey Hexy Cushion, this would mean arranging all the hexagons you need to hand stitch the cushion top. 

TIP: Make sure the fabrics are facing the correct way. This will be important if you are fussy cutting fabric motifs, as you don’t want to sew a hexagon the wrong way around. 

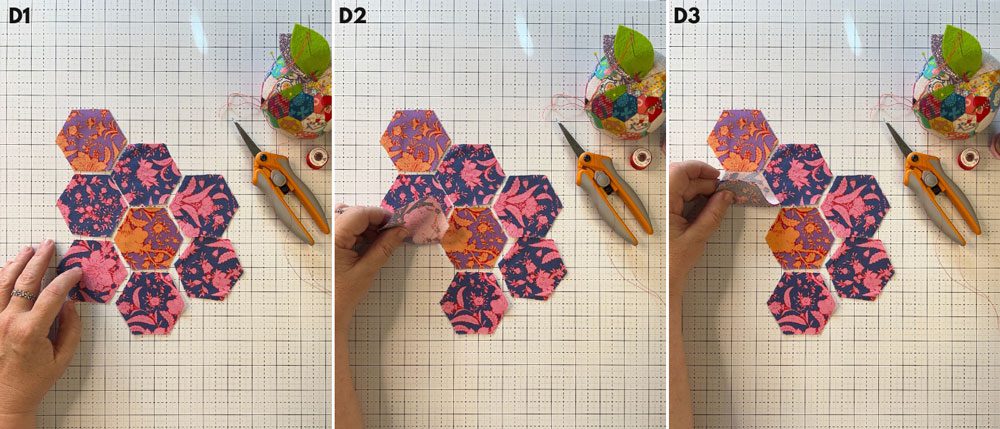
Take the bottom left hexagon D1 and flip it up and over the hexagon above it D2. Pin the base of the hexagon (the seam edge) D3.

EPP D Diagram

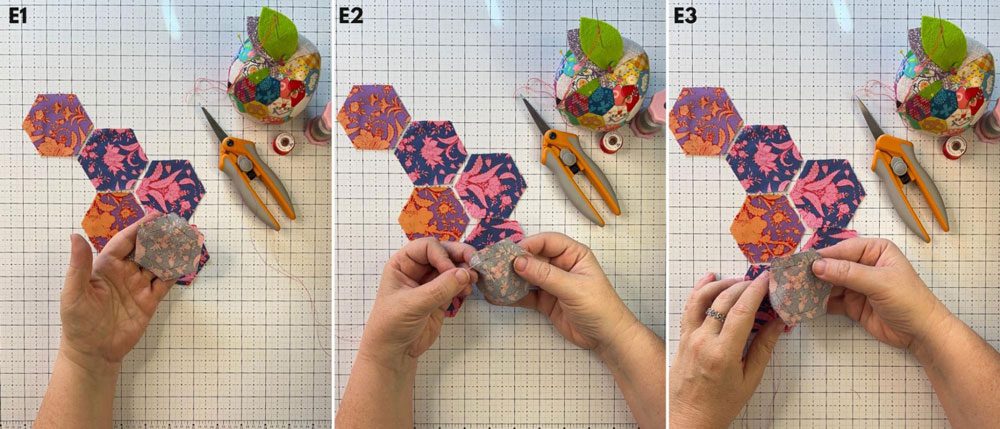
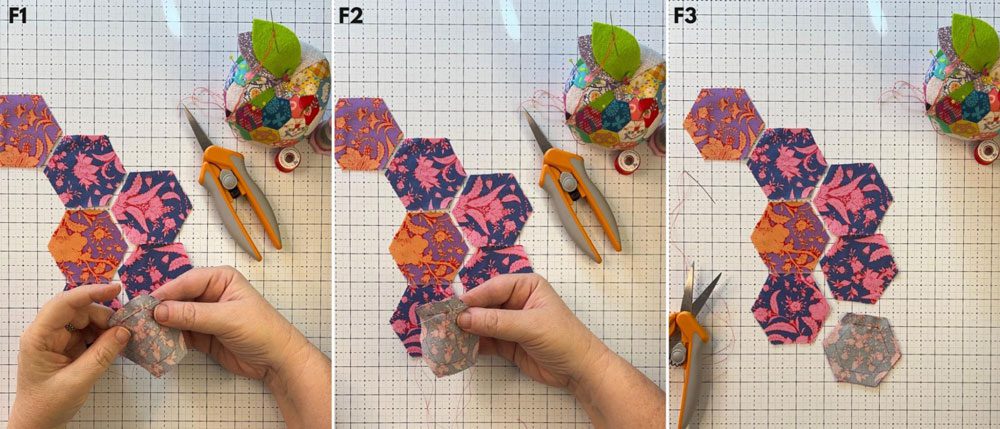
With a threaded needle (and knotted end), start by reinforcing the seam with a back stitch. Then load up your needle to sew small running stitches along the seam line, don’t stitch into the seam allowance, just the seam itself. (Your stitches will get smaller with practice.) At the end of the seam do another back stitch and knot off the seam E1-F3.

EPP E Diagram
EPP F Diagram

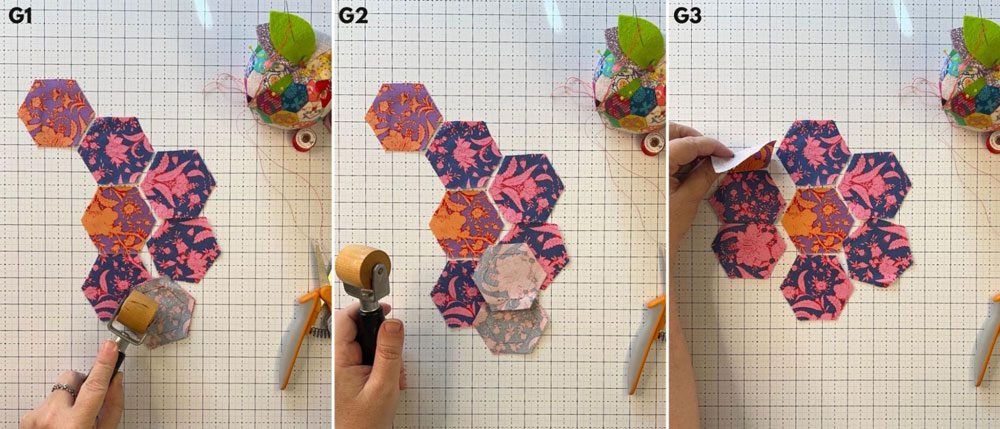
Take a seam roller and roll the seam whilst it’s closed and then pull it open and roll again. (We’re not looking to ‘set’ the seam at this point, we’re just opening it out to continue stitching. By not ‘setting’ the seam we’re allowing for some ease in the seam.) Flip the piece back over and in place and then add the next hexagon to the row G1-G3.

EPP G Diagram

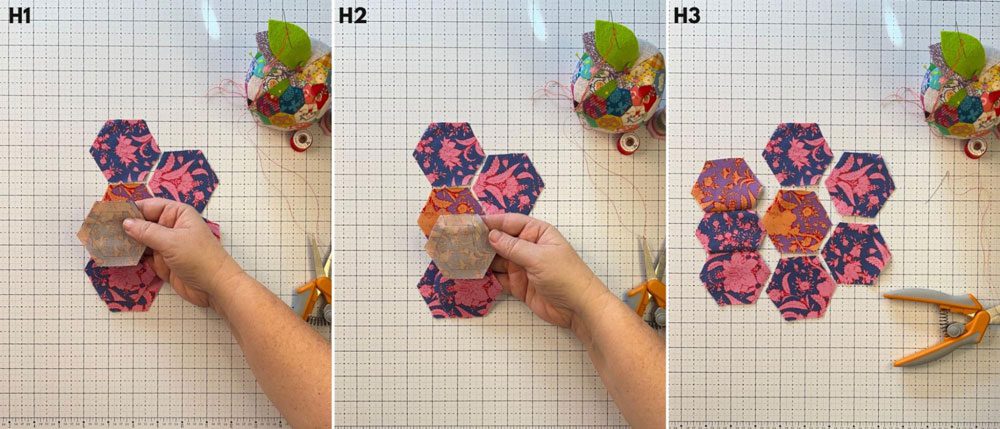
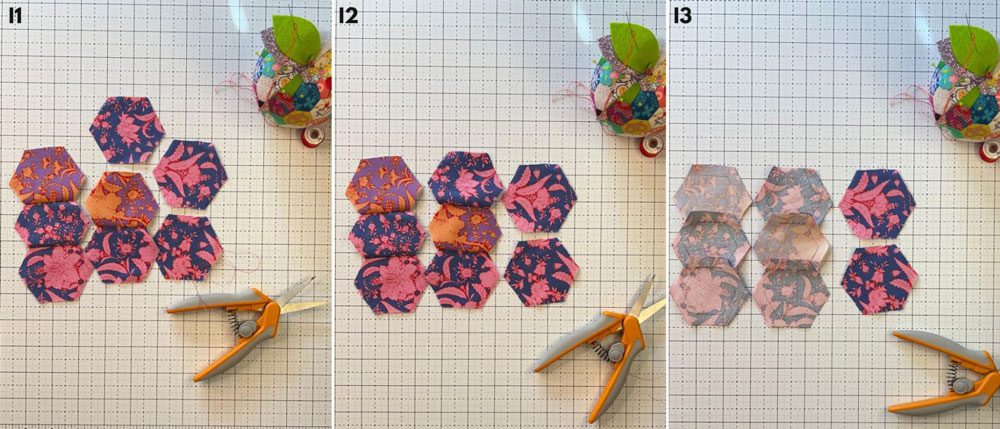
Pin, stitch and seam roll the next seam to be stitched and continue to sew rows of hexagons, as shown in H1-I2. Set all the seams in the same direction for each row, as seen in I3.

EPP H Diagram
EPP I Diagram

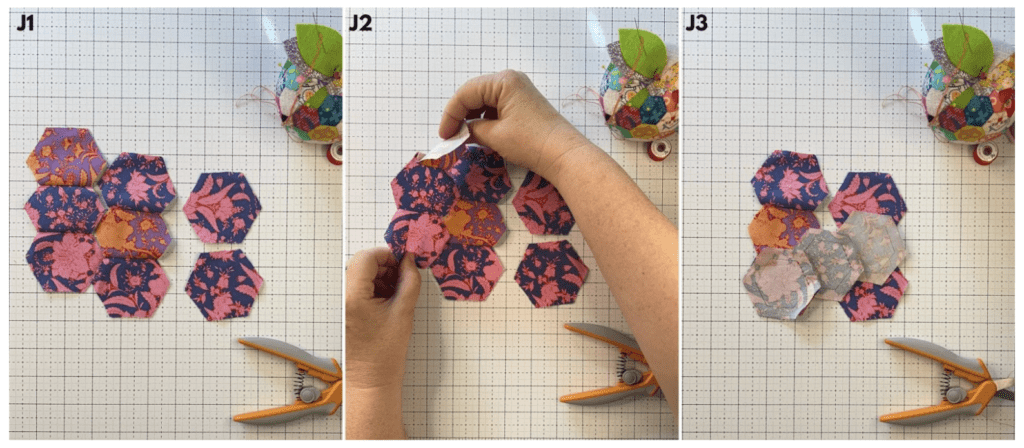
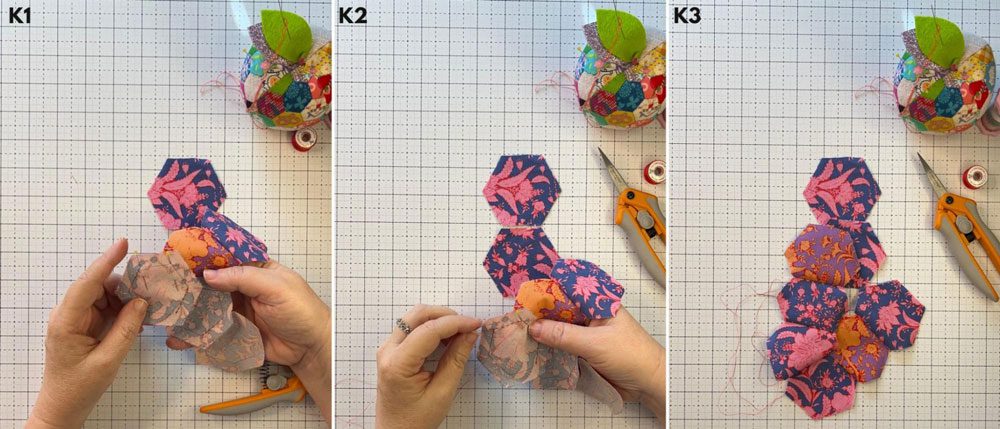
Next we’ll join the rows together. Take the first row and flip the row down on an angle J1-J3. Pin and sew the seam K1-K2. Don’t cut the thread at the end of the seam. Do a backstitch at the end to secure the seam.

EPP J Diagram
EPP K Diagram

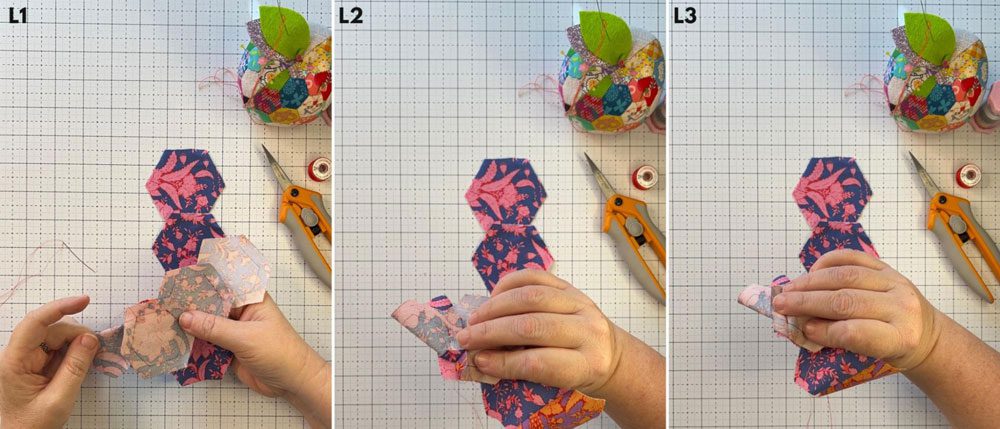
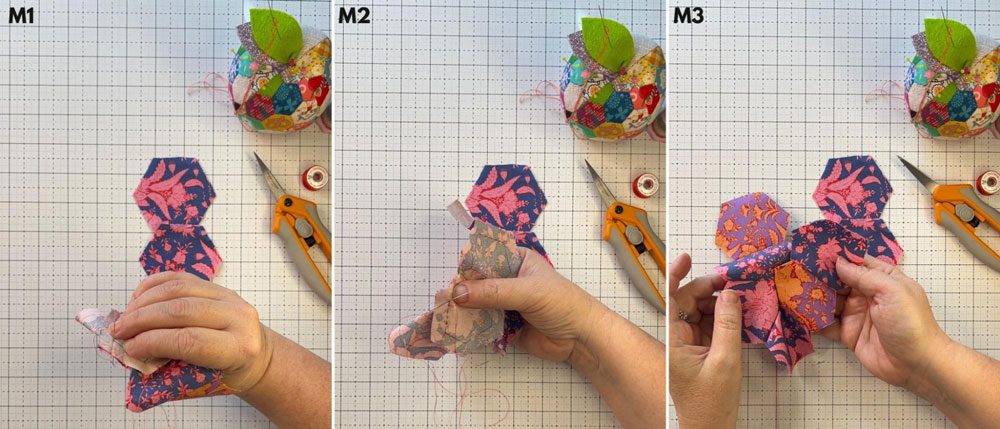
Pivot the end of the strip on top to the next edge. Pin and stitch. Do not sew into the seam allowance L1-M3.

EPP L Diagram
EPP M Diagram

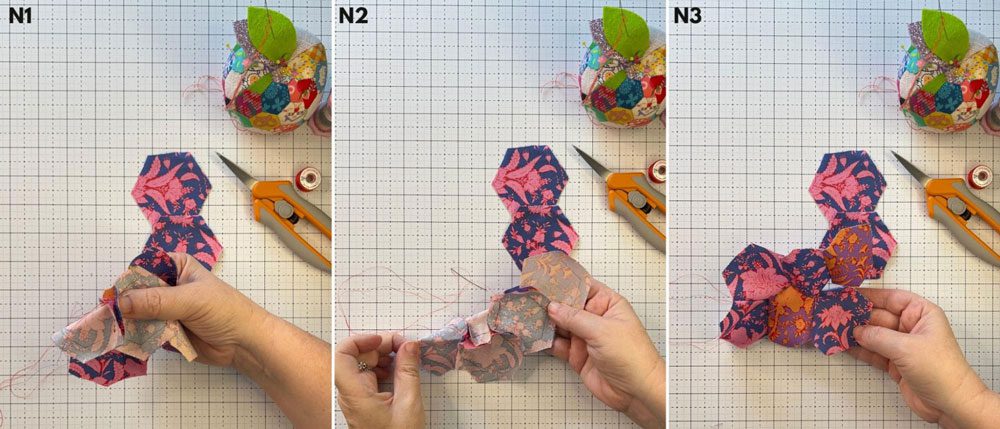
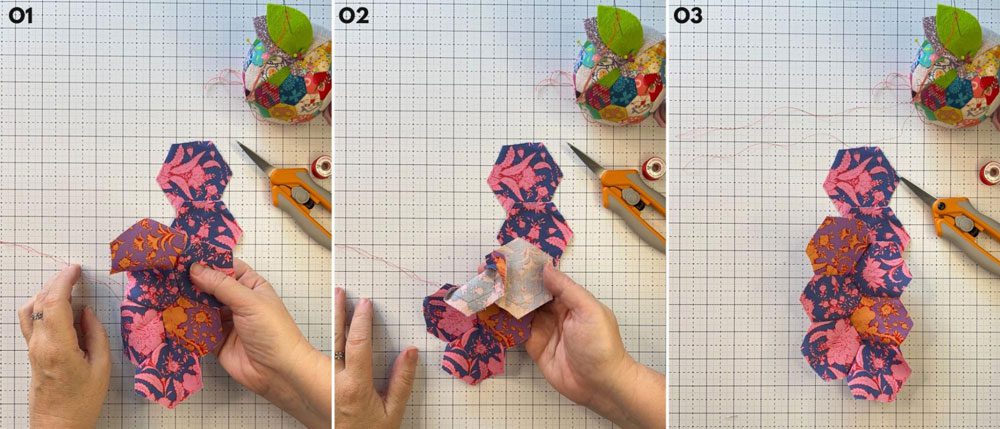
Continue stitching along the edge, not sewing into seam allowance and pivoting to the next hexagon seam edge N1-O3. As an added bonus, I have prepared a video for you to watch the zig-zag seaming process at this LINK.

EPP N Diagram
EPP O Diagram

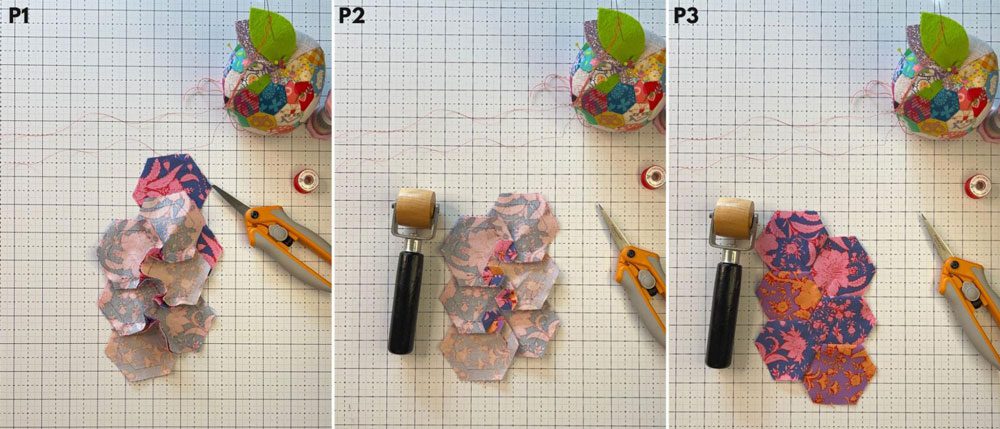
This is where the magic of not sewing into seams comes into play. Flip the finished row over and press the seams as shown in P2. You are done! You have successfully sewn EPP paper free!

EPP P Diagram

Now you can sew all of your prepared shapes using this method. 

Next time you see an English paper pieced block or quilt you’d like to sew, but you have an allergy to papers like me [kidding!], try hand sewing instead. I reckon you’ll grow to love it as much as I do. 

To receive a free downloadable PDF of these instructions click HERE and it will be emailed to your inbox. There is also a very special offer for Quilters Candy readers for the Hey Hexy cushion.

Thank you for coming on a hand-piecing adventure with me! I would love to see your Hey Hexy sewing. Follow me on Instagram and tag #HeyHexyCushion. 

For more hand piecing, quilt making, and stitchy fun, sign up for my Scrappy Digest newsletter.

Nic Vaughan

You can also find me on socials. Come on over and say hi!

Instagram

Facebook

Pinterest

Nic x

MORE BLOG POSTS LIKE THIS ONE


Did you enjoy this tutorial? Be sure to check out these free tutorials: 

Tips for Quilting with Minky

Tips on Sewing a Curved Quilt

Fast and Easy Split Quarter Square Triangles

or SEARCH THESE

Popular categories

Craft to Career
Digital Downloads
Patterns
Podcast
Quilt Alongs
Quilt Questions
Tutorials
back to the top

Copyright 2024 Quilters Candy  |  Terms & Conditions