How the It Takes A Village Panel Quilt Play Mat Supports Child Development
- Cognitive Growth: Use the quilt’s patterns and shapes to teach colors, numbers, and letters. Play matching games to boost memory and problem-solving skills.
- Social & Emotional Skills: Encourage turn-taking and cooperative play. The quilt creates a safe space for bonding, helping children develop empathy and self-regulation.
- Physical Development: Create fun obstacle courses or movement games on the quilt to strengthen balance, coordination, and motor skills. Try these activities with your little one today!
Follow me for more creative ways to use fabric projects to teach and bond with the children in your life!
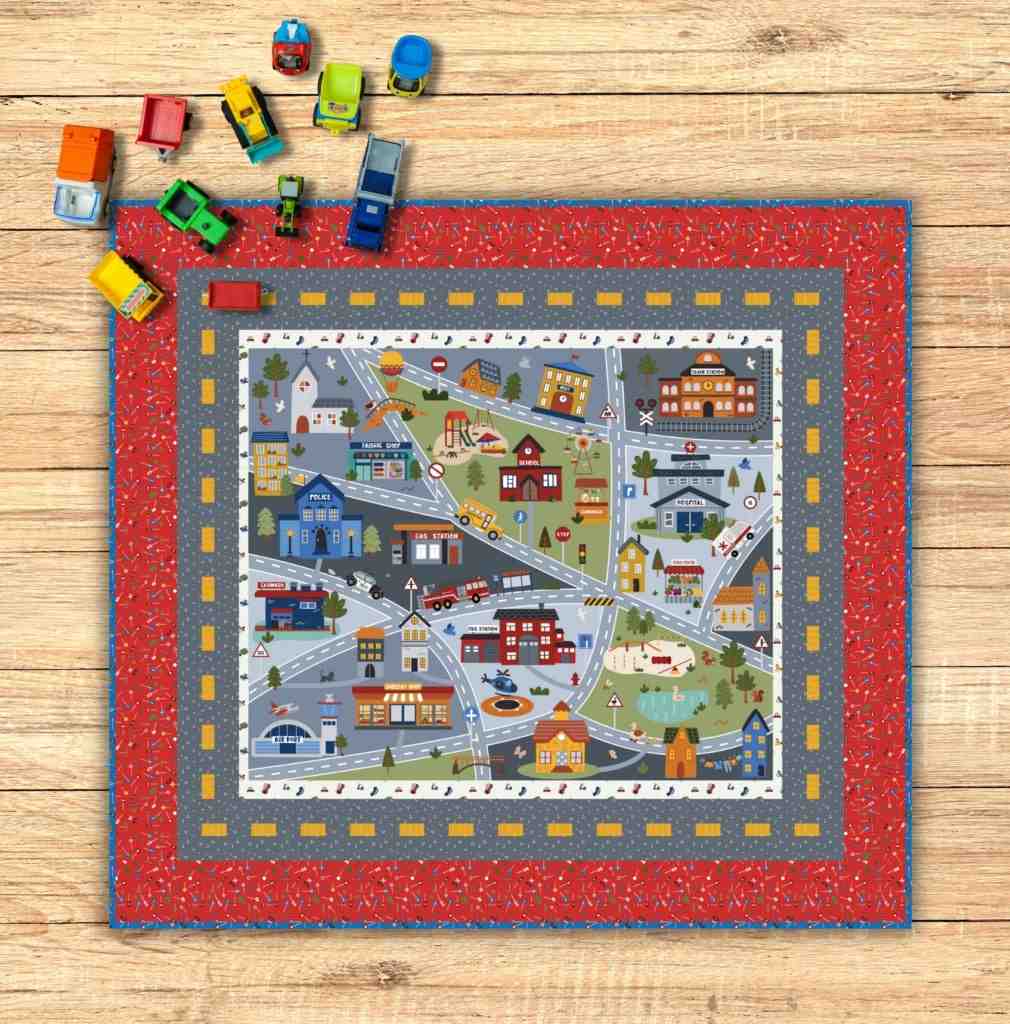
It Takes a Village Panel Quilt Play Mat Instructions
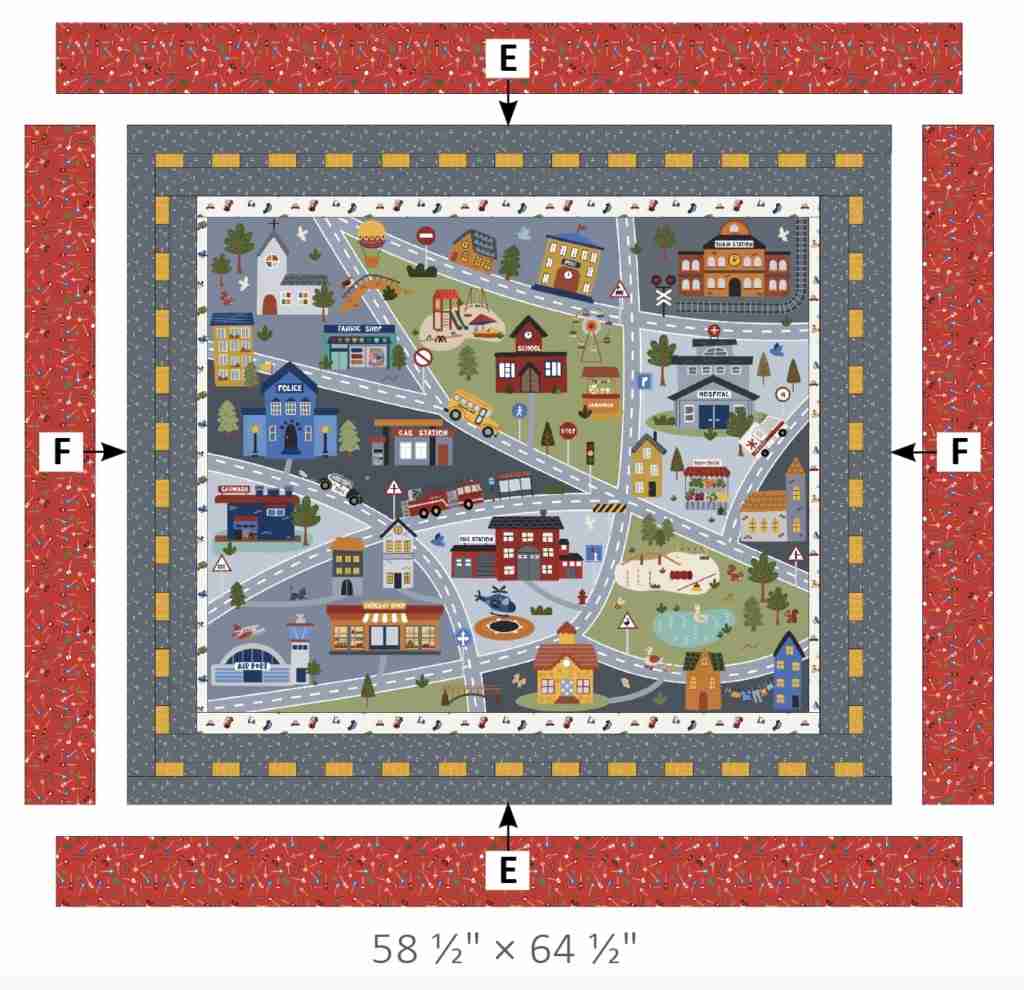
FINISHED PLAY MAT SIZE 58 1/2″ × 64 1/2″
Pattern by Jennifer Long of Sew A Story
© 2024 Sew A Story Ltd., All Rights Reserved – Jennifer Long
GENERAL INSTRUCTIONS
Please read all instructions before beginning this project. Yardage calculated using a 42″ usable width of fabric. Refer to the website: www.sewastory.com/pattern-updates for any revisions before starting this project. This pattern requires a basic knowledge of sewing techniques and terminology. The project diagrams portrayed are virtual images. The layout and look of your project may differ when using actual fabric. It is not recommended to prewash fabric before cutting and assembling.
Always verify your panel size before beginning. If your panel measurements differ from those given in the pattern, trim to the desired size or use coping strips to alter the size of your panel. If coping strips are needed, add oversized, coordinating strips of fabric to the necessary edges of the panel, then trim to the size specified in the pattern.
SEWING TECHNIQUES
Sew all seams RST and with a 1/4″ seam allowance unless stated otherwise. Refer to the quilt layout diagram for placement of the prints. Press seams as desired unless stated otherwise. Dimensions listed in steps are unfinished sizes.
WOF = Right Sides Together
RST = Right Sides Together
FABRIC REQUIREMENTS
All fabrics from the It Takes a Village fabric collection by Jennifer Long of Sew A Story for Riley Blake Designs unless stated otherwise.
(1) P15468-Panel It Takes a Village Play Mat Panel (play mat center)
1/4 yard C15465-SUNSHINE Tread Marks (yellow road)
1/3 yard C15464-CLOUD Traffic Jam (inner border)
1 yard C15462-FIRE Traffic Signs (outer border)
1 yard C15466-SMOKE Shining Star (gray road)
5/8 yard C15462-BLUE Traffic Signs (binding)
Additional Supplies:
Basic Sewing Supplies
1 7/8 yards Wide Back backing fabric of your choice
Batting
CUTTING INSTRUCTIONS
When cutting fabrics, use a straight edge ruler and rotary cutter. Measurements include 1/4″ seam allowance. Label, allocate, and organize all cuts as noted.
It Takes a Village Play Mat Panel (play mat center)
Fussy cut (1) Panel 35 ½” × 43″, centered over the motif as shown.
*Note: If the panel motif reaches the edge of the cut, add coping strips first and then trim to the required size once the strips are added.
Sunshine Tread Marks (yellow road)
Cut (2) 2 1/2″ × WOF strips; subcut from (1) strip:
(4) 1 1/2″ × 2 1/2″ rectangles. Label as A.
Set the remaining WOF strip and the remainder of the cut strip aside. Label as B.
Cloud Traffic Jam (inner border)
Cut (3) 2″ × WOF strips. Piece together end-to-end; subcut:
(2) 2″ × 44 1/2″ strips. Label as C.
Cut (2) 1 1/4″ × WOF strips; subcut:
(2) 1 1/4″ × 35 1/2″ strips. Label as D.
Fire Traffic Signs (outer border)
Cut (6) 5 1/2″ × WOF strips. Piece together end-to-end; subcut:
(2) 5 1/2″ × 64 1/2″ strips. Label as E.
(2) 5 1/2″ × 48 1/2″ strips. Label as F.
Smoke Shining Star (gray road)
Cut (12) 2 1/2″ × WOF strips. Piece (10) together end-to-end; subcut:
(2) 2 1/2″ × 54 1/2″ strips. Label as G.
(2) 2 1/2″ × 50 1/2″ strips. Label as H.
(2) 2 1/2″ × 44 1/2″ strips. Label as I.
(2) 2 1/2″ × 38 1/2″ strips. Label as J.
Set the remaining (2) WOF strips aside. Label as K.
Blue Traffic Signs (binding)
Cut (7) 2 1/2″ × WOF strips. Set aside for binding.
QUILT ASSEMBLY
- Gather (1) B-strip and (1) K-strip. Sew together, referencing the diagram for proper placement and orientation. Press. Subcut strip set into (28) 1 1/2″ units. Repeat with remaining B-strip and K-strip to create (42) total strip set units.