
3 Ways to Finish a Quilt by Hand
Amanda from Broadcloth Studio shares 3 Ways To Finish Your Quilt by Hand (besides a running stitch)
Hi, folks, Amanda of @broadclothstudio here. Before we go any further, I’ve got a confession to make: I don’t like machine quilting. *GASP* I know.
Now, before you turn your back on me, let me be clear: I like when other people machine quilt things, but I just don’t enjoy it. To be fair, this may be because I grew up hand sewing and only got a machine a couple years ago. Or maybe it’s because my mother instilled the fear of [insert your personal direst of consequences here] if I ever played around with her favorite sewing machine. But, I think it’s because when you hand quilt and finish a project you have a very different tactile experience: as you work your way around the quilt, it’s like giving hundreds of little hugs to the quilt. The batting gets softer and squishier as you go. And because it takes so long to do (let’s call a spade a spade here), there is a lot of quality time spent with the quilt, making for a memorable experience.
But to be honest, sometimes I don’t have the time (or the energy or the patience or the interest) to hand quilt an entire quilt. And since I really don’t like machine quilting, I’m always looking for other options. Enter my current top three “alternative” quilting methods.
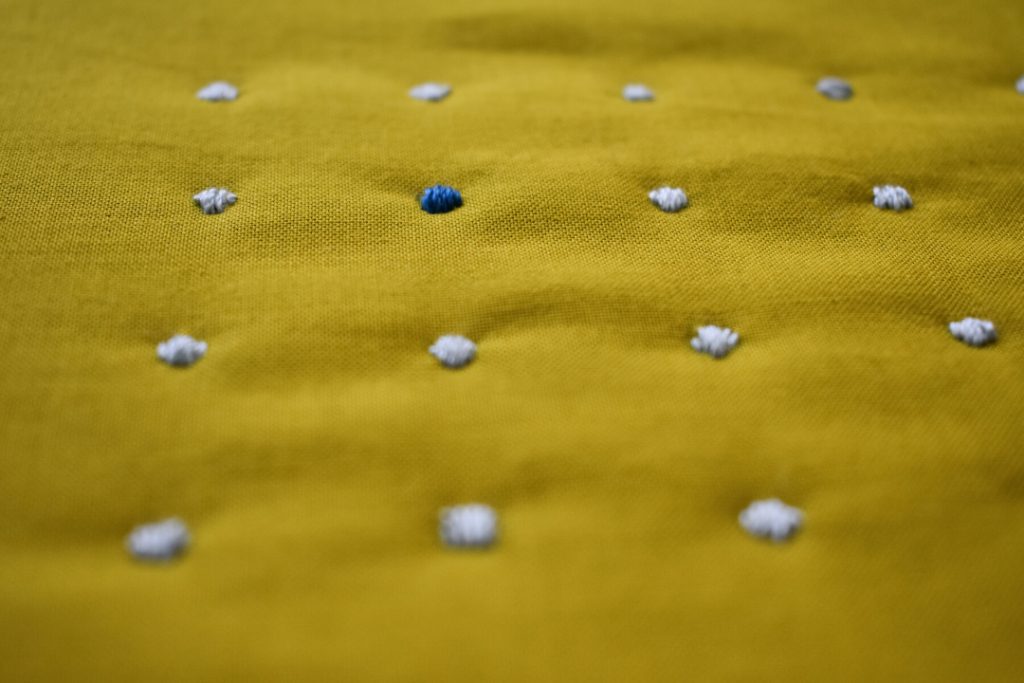
#1 Hand Tying

Hand tying is such a fun way to add texture to a quilt. I especially love it when used with a fluffy batting (like wool) because of the tufting effect. You can use floss, perle cotton, yarn, ribbon, or whatever floats your boat (though I’d suggest something on the heavier end of the thread spectrum to play up that textural element).
Thread your needle and make a regular running stitch through all the quilt layers where you want the knot to be, leaving a three inch tail. Make a backstitch through the original hole and back up through the layers of the quilt ending through the second hole. Tim the thread with a three inch tail and repeat the ties across the quilt as desired. Square knot all the stitches and trim the tails to your desired length.
Note: if you’re a little impatient like me, you can square knot each stitch as you go and then cut your thread (just leave a long enough tail so you can trim all your knot tails to a uniform size at the end) before moving onto the next stitch. It might not be the “correct” way to do it, but 1) who cares and 2) who will ever know?
#2 Cross Stich-ish


I love the look of cross-stitch, but ugh, I hate the fact the back doesn’t mirror the front. Fortunately for us, thanks to the layers of a quilt, making the front and back mirror each other is easy.
Grab your needle and thread (I like to use a heavier floss). Make your knot and bury your thread as you normally would for hand quilting, coming up with the needle at one of the ends of the X (mark an X on your fabric with your favorite fabric marker/pen/pencil if that helps!). Make your first stitch along one of the lines of the X. On the back, enter directly below the original hole, but instead of coming straight up to the front, “travel” through the batting and bring the needle to the front at the tip of the second line of the X. Make your stitch along the second line of the X. On the back, complete the X and bury your knot (or travel through the batting to get to the next X). And voila! X marks the spot.
#3 Satin Stitch

Another borrowed-from-embroidery stitch (#quiltbroidery)! The satin stitch is super easy, and best of all, it looks the pretty much the same on the front and the back without any fancy traveling-through-the-batting stitch work. I like to use 12wt thread for this, but it’s also fun to play around with different thread weights for different texture.
Satin stitches are incredibly versatile as you’re basically coloring in a shape with thread. For demonstration’s sake, let’s start with a little circle. Grab your fabric marker/pen/pencil of choice and draw a circle on your fabric. Grab your needle and thread, make your knot, and bury your thread as you normally would while hand quilting, coming up with your needle somewhere along the circumference of the circle.
Make a stitch directly across from where your needle came up, going perpendicularly through all the quilt layers. From the back, bring your needle back to the front side with a stitch that comes up right next to the original needle hole. Make a stitch parallel to your first stitch, entering right next to the first stitch but staying on the circumference. Continue stitching until half of the circle is complete then take your needle and weave it through the batting to come up on the other side of the original stitch. Repeat until the entire circle is filled in. Knot and bury your knot as usual.
Pretty easy-peasy. And just think of the options: you could satin stitch little squares, teardrops, leaves, or get fancy with negative space and leave a hole in the middle of a square.
Homework
So here’s my challenge to you: when you’re short on time or if you’re looking to add a little extra special twist of texture, try one of the above. Or riff on these ideas: the sky’s the limit with what shapes you can make!
Looking for some project ideas? How about:
- A whole cloth pillow hand tied with five different shades of yarn to make an ombré effect
- A baby blanket covered in tiny hand stitched hearts (or mix your cross-stitch and satin stitch to make an X’s + O’s blanket)
- A wall hanging with a constellation or connect-the-dots pattern (maybe add in some hand quilting to connect the dots)
P.S. a note on supplies

There are so many different ways to tackle any of the above stitches. But in case it is helpful, here’s what’s in my hand-sewing kit these days (which is really just an old cookie tin):
- Needles: When it comes to needles, I’m currently loving an assorted set of Sashiko needles I picked up years ago.
- Thread: I love working with 12 wt cotton thread (pictured are Aurifil Cotton 12wt #2245, #2140 (this one is serious magic: it goes with everything), #5007) or floss (Aurifloss 1125 and 5015 are pictured above, but I’m also currently obsessed with #1104).
- Scissors: Gingher Stork Embroidery Scissors always and forever
- Marking Tools: I like Clover’s Chacopen Soluble Eraser Pen for light colored fabrics and General’s Pastel Chalk in White for my darks.
- Thread Gloss: I highly recommend using thread gloss as it just makes life so much more easier (my go-to is Sew Fine Thread Gloss in Lemon Peel).
- Hoop: When I’m hand quilting, I generally like to use a quilting hoop: for the cross-stitch-ish and satin stitch, I particularly like to use my smaller 12” one. Both of mine are probably considered “vintage” at this point and I can’t find them online, but just look for a sturdy wood hoop and you’ll be good to go!
P.P.S.
If you’re looking for more “quiltbroidery” stitches, I’m collecting different ones over on broadclothstudio.com as part of an ongoing project, so make sure to check them out (and if you’ve got any ideas of stitches to tackle next, questions on the above, or just want to say hi, send me an email at hello@broadclothstudio.com
If you like this tutorial, you’ll love the tutorial I have on Quilt Binding. Read about How To Use Double Folded Bias Binding for Quilts
RECENT BLOG entries
3 Ways to Finish a Quilt by Hand
3 Ways to Finish a Quilt by Hand
3 Ways to Finish a Quilt by Hand
3 Ways to Finish a Quilt by Hand
3 Ways to Finish a Quilt by Hand
3 Ways to Finish a Quilt by Hand
the latest
July 3, 2026
This week, I’m joined by Jamie Bright of Craft a Dream, and this conversation is such a treat. Jamie is a sharp businesswoman with a real gift for marketing, and her path into quilting is not the one you might expect. Before entering the quilting world, Jamie built valuable business experience in another field. When […]
tune into the
Craft to Career
Podcast
Each week get insights on how to turn your craft into a successful career. With both guest speakers and tips from myself, you get valuable, free education on the Craft to Career podcast!


