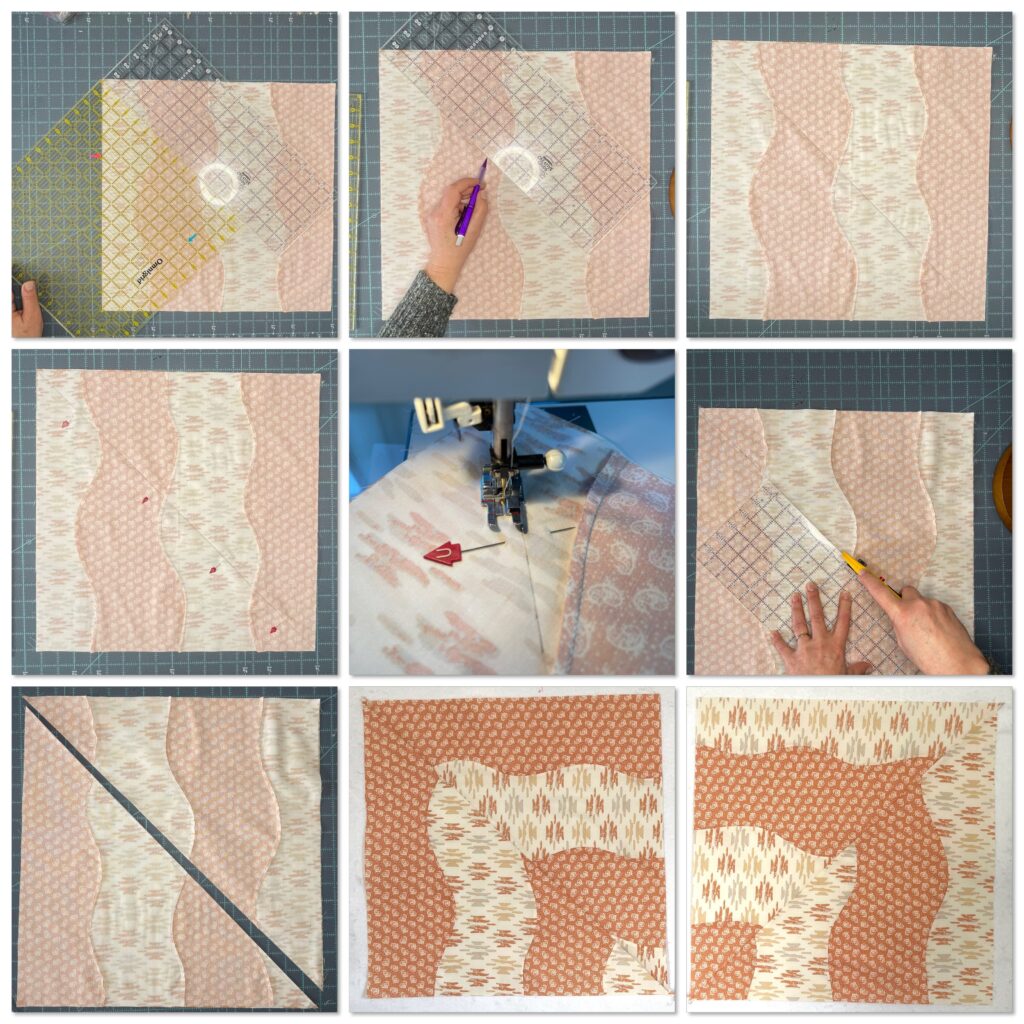
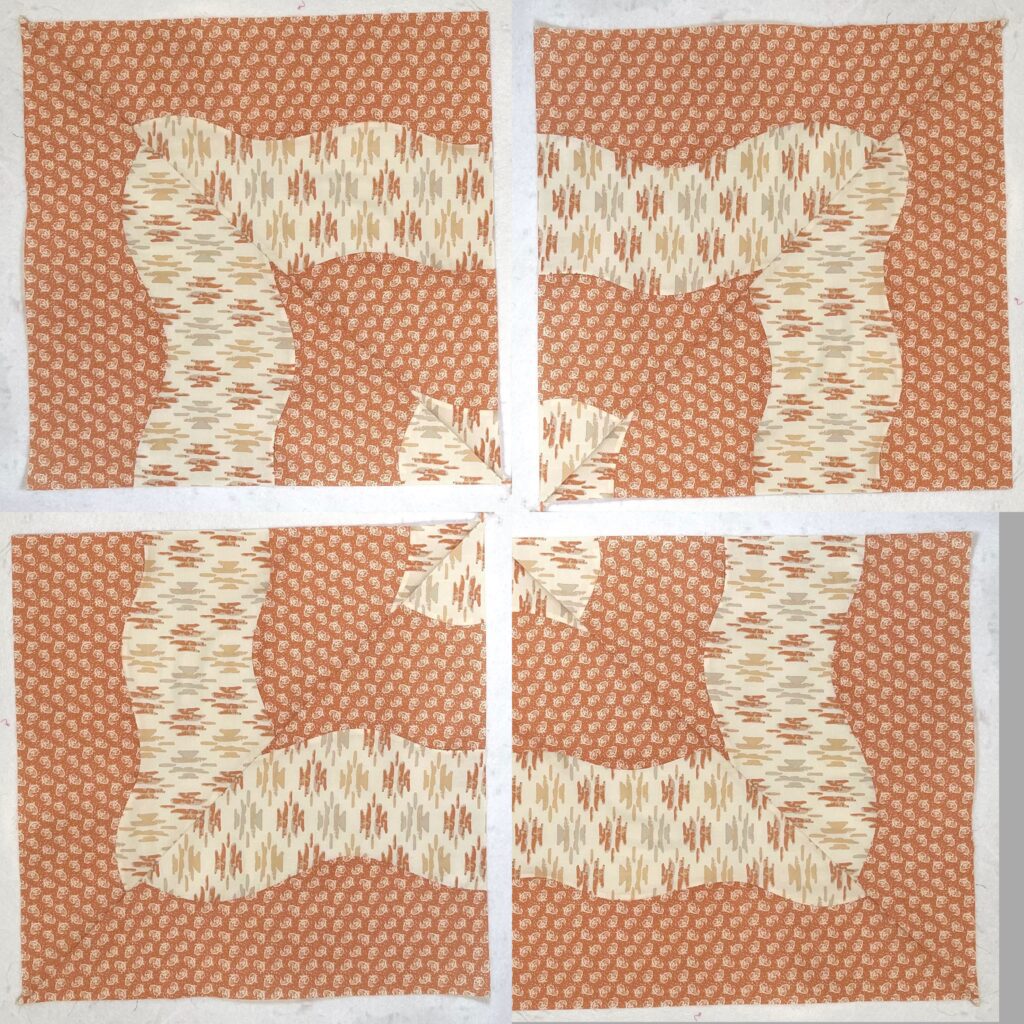
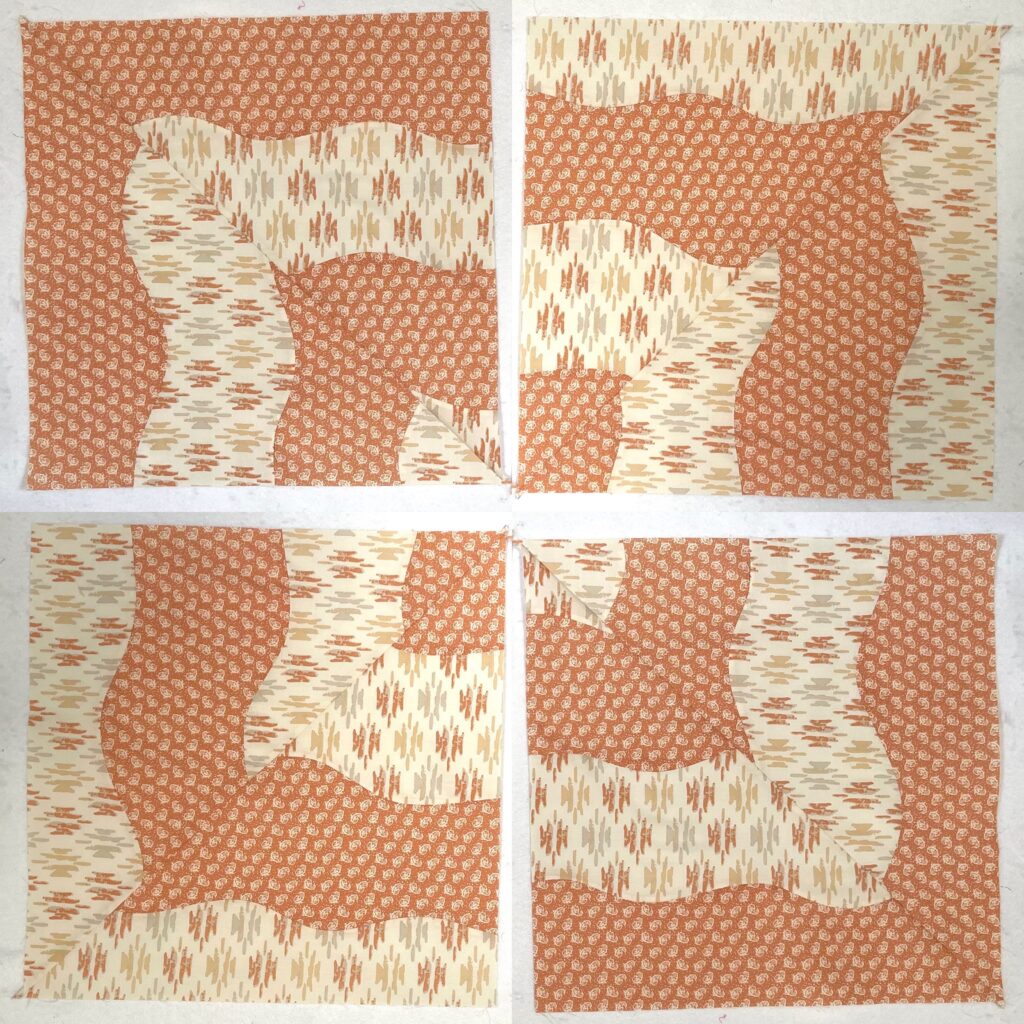
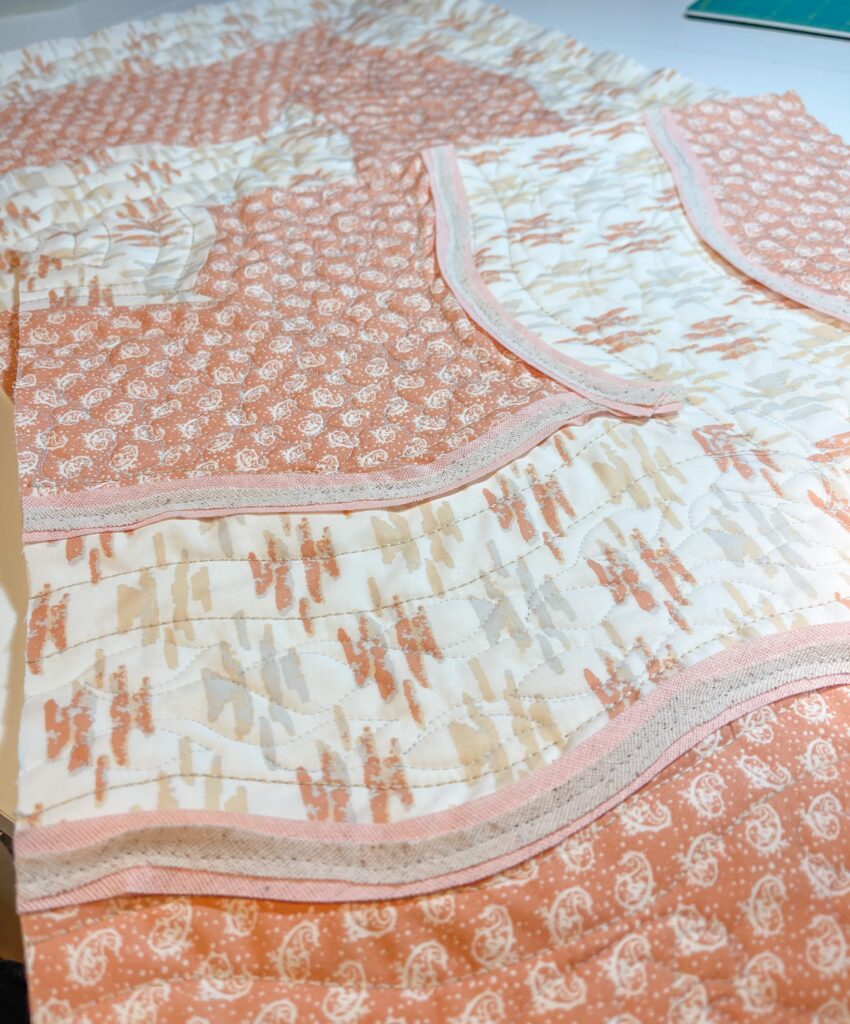
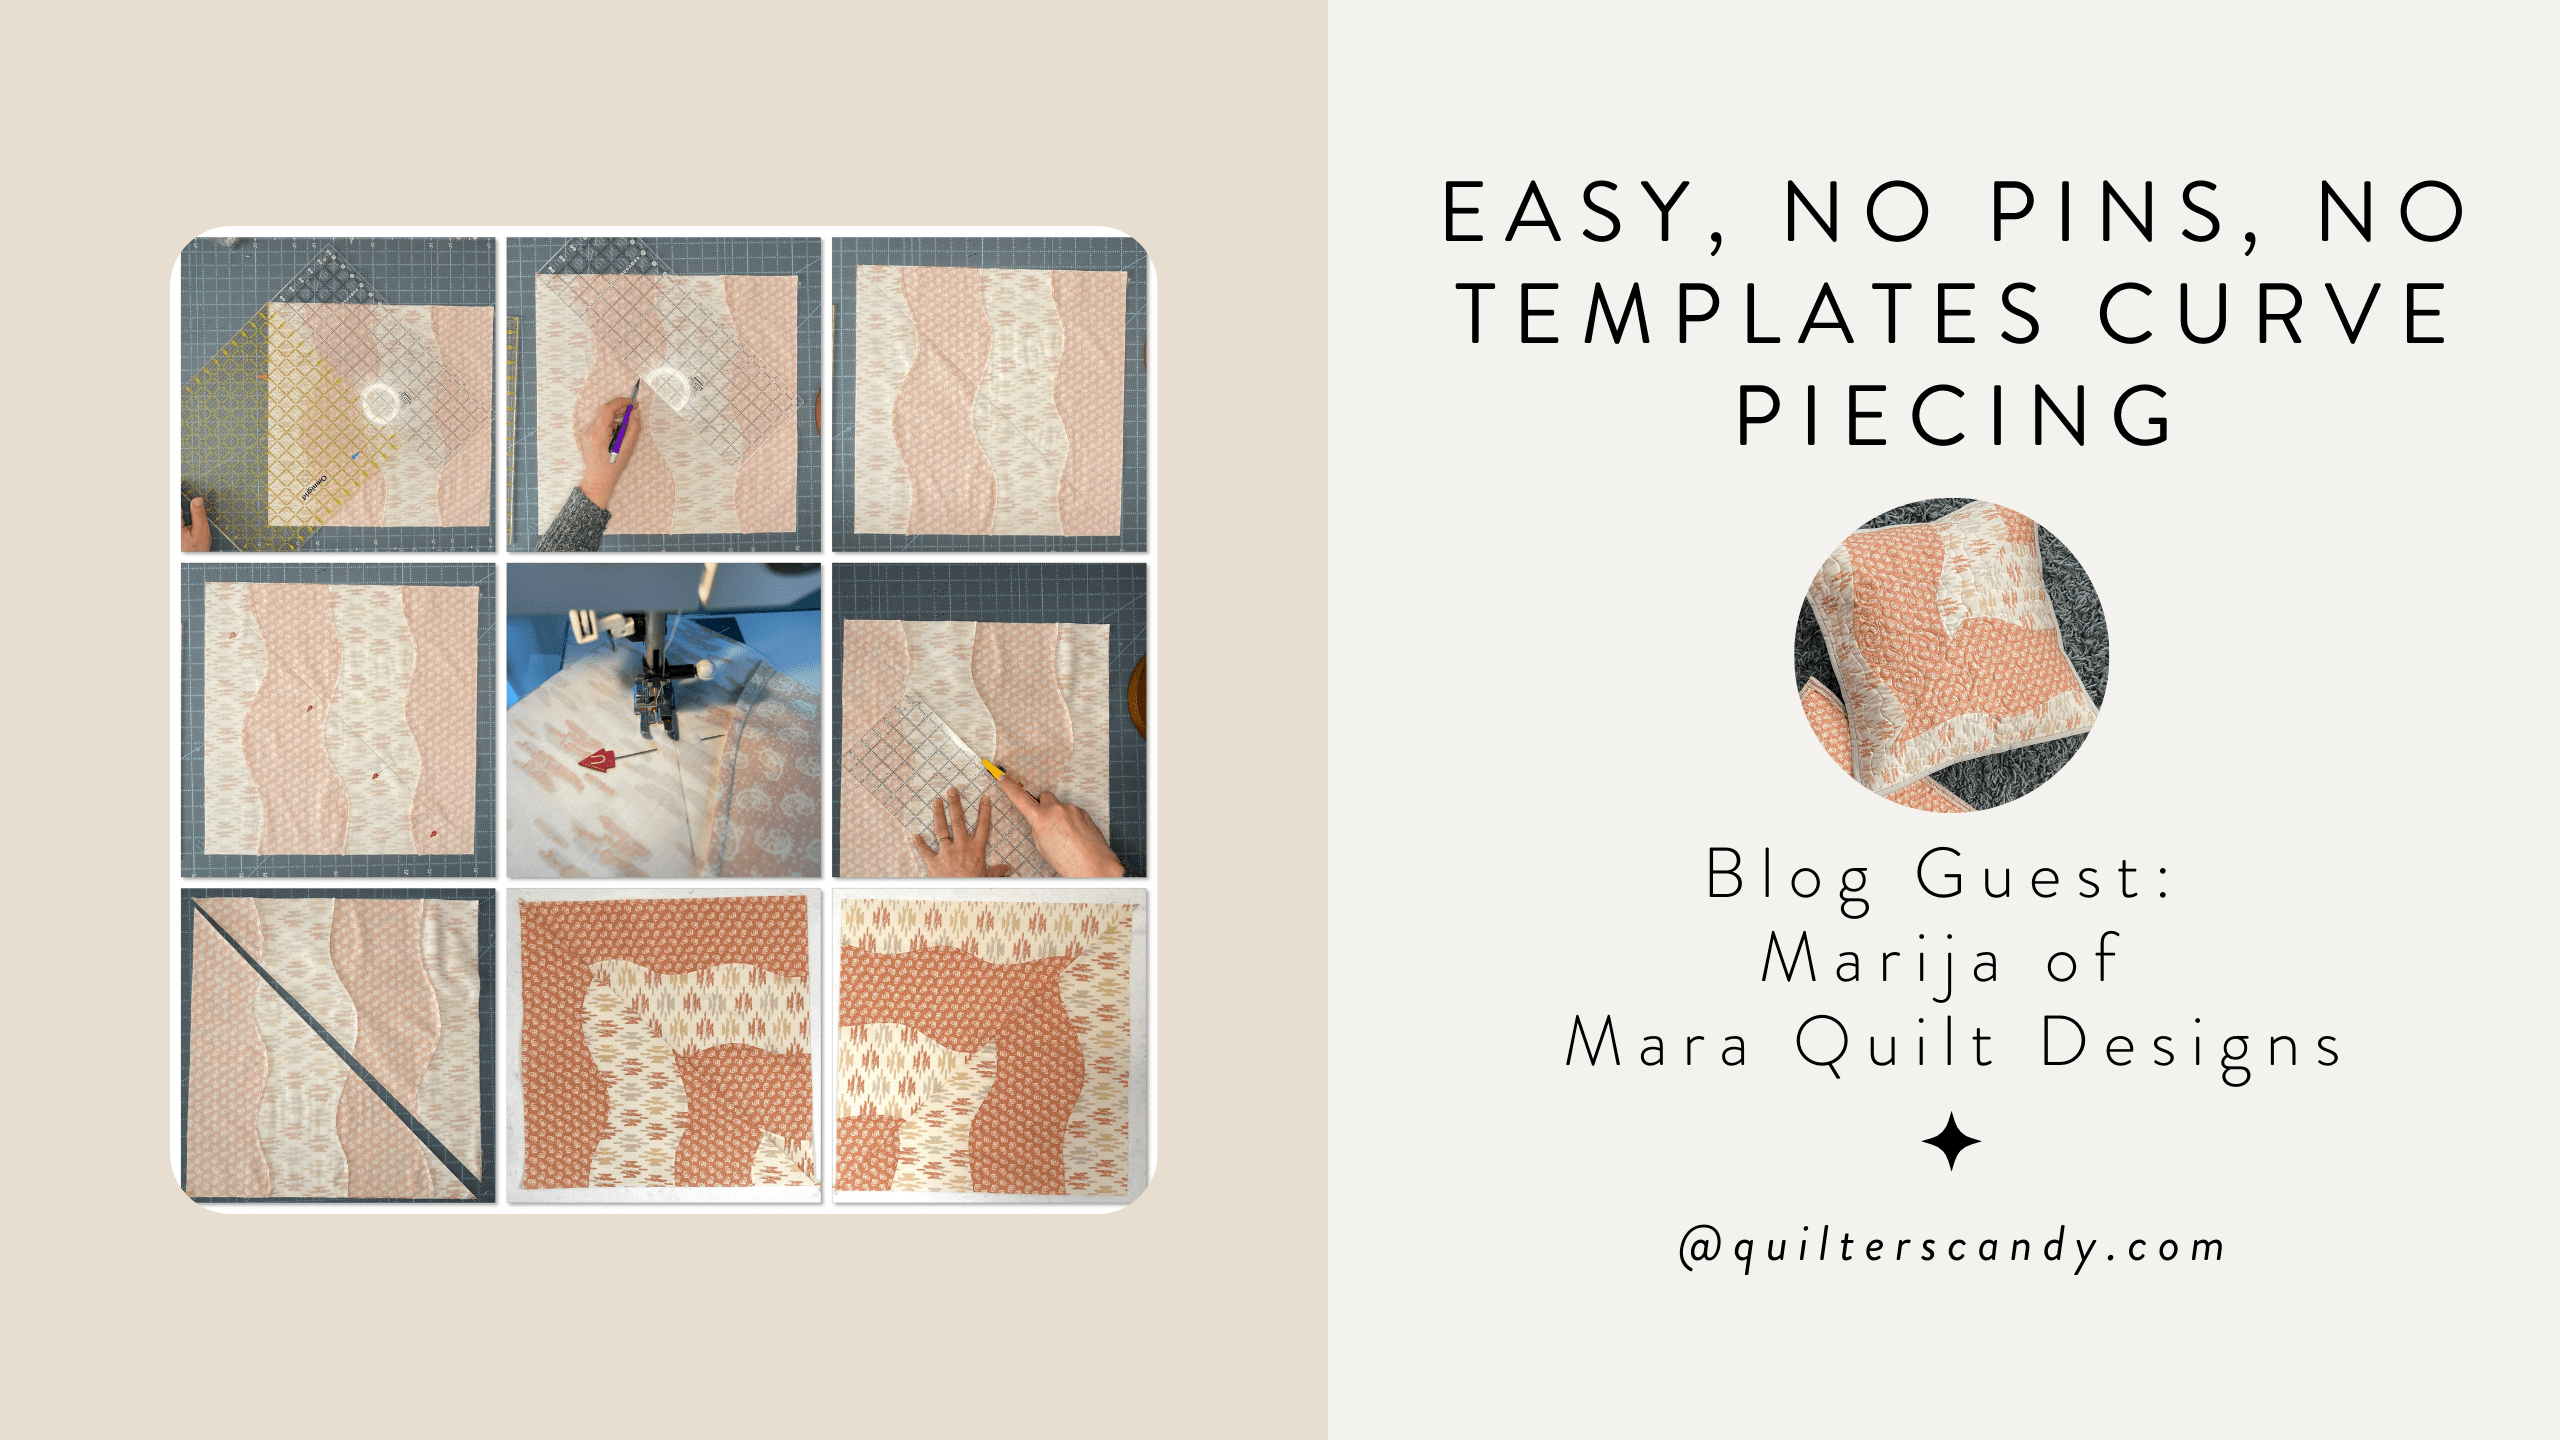
Easy, No Pins, No Templates Curve Piecing

March 9, 2022

Easy, No Pins, No Template Curves Piecing

Hello everyone, I am Marija, pattern designer behind Mara Quilt Designs. I am happy and honored to be a guest blogger on Elizabeth’s blog. I’ll be sharing an easy curve piecing technique. 

I am a wife, mom to three amazing adults, and grandma to four sweetest grandkids, (soon to be five, yay!). I  live in beautiful Buffalo, NY. Cancer research and immunotherapy is my day job and one of my passions. Quilting, pattern design and inspiring creativity in others is my other passion.

I have been sewing since I was nine, but I had never seen a quilt before immigrating to the US with my family in 1992, from then war-torn former Yugoslavia. 

Once I discovered quilting in 1994, my creative soul found a home. I have been playing with fabric, color and design ever since. I design quilts and teach quilting locally. All of this gives me tremendous joy and inspiration every day.

As one of the alumni of both of Elizabeth’s amazing courses (Craft to Career and Quilt Pattern Writing), I hope to soon start publishing patterns under my brand, Mara Quilt Designs.

 And that my friends, will be a long time dream come true!

LEARNING TO SEW CURVES

One of my biggest passions is to inspire makers to dive in and explore their own creativity. To achieve that goal, the most important question you can ask yourself is: “WHAT IF I…?”

For example,

  • What if I flip these blocks?
  • What if I change the color placement?
  • What if I skip a block or two?”
  • You get the idea.

I would like to share with you a very fun and easy technique of cutting and piecing curves. It does not require templates, special rulers, marking tools, or pins for piecing!

Whaaat…? (I can almost hear you saying it, but it is true!!) So let’s get started!!

Easy Curve Piecing

photo 1

MAKE THIS PAIR OF PILLOWS WHILE LEARNING HOW TO CUT AND PIECE GENTLE CURVES

To learn the basics of this technique, we will use 2 Fat Quarters that will become two fun pillows. Pick two colors that go well together but have plenty of contrast (I am using two prints from beautiful Shine On collection by Sharon Holland for Art Gallery Fabrics)

2 fabrics

Easy Curve Piecing

Before we get started, here are some very important points and conditions:

  1. This technique is somewhat improvisational, since the curves you cut are cut free-hand. (No templates or marking.) Therefore they will not be uniform or identical, but that is really the best part!
  2. It is very, VERY helpful to have a sharp blade in your rotary cutter for this. (New or almost new is the best!) It is not fun to have to go over your cuts again if they were not complete. (Remember, there is NO ruler here!)
  3. You will be cutting TWO fabrics at the same time, both facing right side up (this is one of the most important principles of this technique!)
  4. Yes, you might be scared or apprehensive to do this at first without any markings or a template. But trust me – YOU CAN DO IT. And to ease your anxiety and kind of “train” your hand to do it, take a few pieces of paper first to practice a few times. Yes, I did say paper and yes I am aware of the whole “no cutting paper with my rotary cutter” rule of the Universe. So either make an exception for those few cuts or use your “paper” rotary cutter? Personally, I have never seen a big disaster happen if I made a few paper cuts with my rotary cutter.  🙂 After a few cuts on paper, take an old piece of fabric if you are still not convinced, but I am sure you can do it!

For the basic principles of this technique and lots of encouragement, watch my video below.

Let's Make some Fun Pillows!

Start by pressing your two chosen fat quarters – having creases or wrinkles in your fabric will hamper your cutting process.

  1. Place both fat quarters on your cutting board, on top of each other (match raw edges the best you can), with both right sides facing up. We will be cutting parallel to the SHORT side of the fat quarter and will make a total of three cuts. (NOTE: the number of cuts is not “written in stone” by any means, however, when you are just learning this technique, it is easier to deal with “chunkier” pieces and not have too many cuts and seams to do – so lets do three cuts for this first project! )
Photo 3

2. To have the cuts somewhat evenly spaced, start with the one approximately in the middle and then make two more cuts, one on each side of the middle one. Remember the advice from the video – do not slant your rotary cutter as you go, make gentle wavy curves from one edge to the other. Do not move any of your fabric pieces at this point.

3. Even the top long edge of the two fat quarters. This is a very important step for piecing to work well, so don’t skip it! Simply place a long ruler on the top edge of your two fat quarters and even the two as shown in the video. This top edge will be where you will start your piecing and evening out the top edge means that your two curves will match and therefore stitch smoothly.

4. Once you evened that top edge, it is time to do a “fabric exchange”: take every other cut piece (for example, first and third), and exchange two layers of fabric – put fabric piece that was on the top to be now on the bottom and return the pieces to their place  back on the cutting board. You will now have two layers that will have pieces in different colors. Those are your two piecing sets. Carefully remove the top layer pieces and place them by your sewing machine, keeping the order as it was on the cutting board and  – more importantly! – keeping that top, evened edge on the top! (you can “label” that edge by placing a pin in it, if that would be easier for you).

5. Now it is time to stitch! Refer to the instructional video from the beginning of this post for the tips and actual process, but here are few tips and reminders that are very important:

a.  Remember, as you flip one piece on top of the other, right sides together, nothing will match! And that is ok. As I said in the video – think about this curved seam as the series of very short straight seams. Only a short section of the seam will match and that is what you stitch, and then adjust and stitch again… and repeat.

b.  For the very beginning of your seam, your two pieces will match evenly if your cut came perpendicular to the fabric edge. If your cut came at a different angle, you will have a little triangle sticking out (a little “dog ear” as we quilters call it?) at the very beginning (see two photos below)

photo 9
photo 10

c.  Having a “needle down” option on your machine is very helpful, use it. If you don’t have that option, just remember to lower your needle down into the seam every time you stop.

d.  Remember to stitch slowly, handle both fabrics gently (it is all bias, so it stretches easily), and avoid stitching over pleats (they just need to be smoothed-out as you go by lifting the presser foot and smoothing them out).

e.  Go slow and – remember to breathe! 🙂

 6. Once you finish stitching one seam, press it towards one side. Be careful not to press and manipulate the other, cut edge of the fabric as it is bias and can distort. Again, the video shows how I do the pressing.

photo 11

7.  Continue stitching and pressing the remaining two pieces to complete one of the two sets you created when cutting. Repeat all the steps for the other set and you will have two, curvy-pieced new “fat quarters”! Of course these are somewhat smaller than the original two fat quarters, but you just created two beautiful new pieces!! YAY!

8.  For the pillows I created for this guest blog post, I trimmed both of them to the biggest size SQUARE I could, which was 17” square.

9.  Do you have to make two pillows like I did at this point? Absolutely NOT!! You can leave them as is and make pillows, you can join these two to make a table runner, you can make more and make…whatever you want!

sewn curves

10.  OK, OK, let’s get back to our project now. Which is yet another fun thing you can do – place these two squares on top of each other, right sides together, to make – yes you guessed it – two large HSTs!! I promise I am not crazy, just love to play and hope you will too!! LOL! What’s even more fun with curvy pieced squares like this – multiple possibilities on how these HSTs will look!!

curves

11.  If you pair them with colors matching (top of the photo above), you will get HSTs looking one way and if you pair them with colors opposing (bottom of the photo above), they will look different! One problem? – deciding which one to choose!! 🙂 But isn’t that the best type of problem to have? To be able to play, play, play…

12.  I decided on the “matching colors” option and went to make those giant and fun HSTs: draw the diagonal line in the middle, stitch ¼” on either side of the line, cut in the middle and press – viola!! (photo below shows these steps, starting from top left, but you know the drill!)

construction

13.  Now wasn’t that fun? Can you imagine the possibilities?? Could you see making large blocks like this and making a whole quilt with them? Well, now you can do it!! Here is just a little hint… (me just making a collage here)

blocks batting

At this point it is entirely up to you what you like to do and how you like to finish and make these into pillows. Quilted or not, zipper or envelope closure, or… no pillows at all! It’s all yours!!

However, here is what I did to create two pillows shown on the photo at the beginning of this post:

  • I first sandwiched these with a piece of batting and plain solid backing and quilted to my heart’s desire. I used wool, loftier batting for one and cotton, less lofty batting for the other, to play with quilting textures. On one of them, inspired by the lovely talk by Nannette of Chenille-It, (link for the site: https://www.fauxchenille.com/ ) I used some blooming bias tape for even more fun texture. If you never used blooming bias tape, visit the web site above to see what you have been missing!
photo 18
curves in a quilt
  • To create pillow, I choose envelope style – placed two overlapping rectangles on the back, pinned and stitched all around the edges
photo 20
  • I choose to bind one in a classic way just like any quilt), and to use Chenille-It blooming bias for the other (for this way to bind, check a free tutorial by Sharon Holland below:

I am so lucky that our goofball pup, Charley, decided to model here and show you both of these types of finishes/bindings. He is an expert, you know…. 🙂

FREE PDF INSTRUCTIONS

For the complete, downloadable and printable instructions for this fun technique and to make these pillows, click HERE.  (link for my Opt-in is: 

I hope you are intrigued to try this fun and very, very creative and versatile technique. In the tutorial I share some additional possibilities and photos of what I used it for, so be sure to check it out.

Remember that creativity-driving question I mentioned at the very beginning, “WHAT IF I…?”

What if I use bigger or smaller fabric pieces? What if I make more cuts? What if I use multiple colors? What if I cut finished pieces differently? SO. MANY. POSSIBILITIES. 

My biggest hope is that you will give it a try and then use it to play, play, play!!

If you do, please also – share, share, share!

 I would love to see what you come up with, so please tag me at @maraquiltdesigns. 

My deepest gratitude goes to Elizabeth. Not only for this opportunity, but also for being an amazing and generous teacher and wonderful friend. Thank you so much Elizabeth!

Wishing you all happy days and fun creations,

Marija

or SEARCH THESE

Popular categories

Craft to Career
Digital Downloads
Patterns
Podcast
Quilt Alongs
Quilt Questions
Tutorials
back to the top

Copyright 2024 Quilters Candy  |  Terms & Conditions